 When I bought my home many years ago there was a gas fireplace insert into the masonry fireplace in the basement. The day finally came when that gas fireplace needed to be replaced. Coincidently it was also around the same time that my home theatre needed to be replaced. (Honest! This was not a “guy excuse” for shopping)
 I was able to use the convert my masonry fireplace into a home theatre system. The fireplace was not a feature that my family used, and while looking nice, was actually wasted space. I no longer had the interest or time to chop wood or store it.
My wife will tell you that I have a very big imagination. I used this to create a space that our family would enjoy. Currently it was not a area that was being used for family functions or living space. It needed some TLC.
The gas fireplace, upon closer investigation, had an insert that could be removed. I repainted the wall in the basement a more inviting and warm colour combination. I also laid some carpet to truly warm up the space.
But how to get the home theatre going ??
RUNNING CABLES:
This home theatre, required getting a cable from the Bell Expressvu satellite dish that was connected outside to my chimney, down the fireplace. Talk about dropping cable.. I have the perfect pathway! The basement layout was not ideal for surround sound, and that required me to make changes for the space that I was presented in order to make it work.
I connected two RG6 cables from the dish and dropped it down the chimney all the way to the basement. I pulled them down out of the fireplace and onto the floor with the hope that they will be plugged into the Bell Expressvu Box.
CAPPING A CHIMNEY
I capped the chimney outside. This would prevent moisture or the elements to come down the chimney and damage any of the wiring or components. The chimney also needed to be stuffed with insulation to keep the cold air out.
Then I ran a channel lock moulding right above the trim on the floor. This allowed me to hide the speaker wires that run from the surround sound rear speakers and woofer to the AVR. In the picture you do notice it, however when walking into the basement itself, it is not noticeable, unless you specifically look for it.
Punching a hole in the wall near the ceiling and another below it closer to the floor. This allowed for dropping the speaker cord down it and eliminating its appearance on the wall itself.
SUB-WOOFER LAYOUT
The sub-woofer was behind the couch that had the speaker wire plugged into it going into the channel lock. A power cable going into a wall outlet, again reduced the unsightly view of wires. The wall beside the masonry fireplace is a sub wall made of 2×4 with dry wall on it. It also had a power outlet now used to power the home theatre.
The purchase of an APC Voltage regulator was mandatory to protect my investment.
I pushed a small hole in the wall behind the TV and dropped an HDMI cable from it. A power cord down was placed behind the sub wall of the mantle of the fireplace. This went down into the mouth of the fireplace. I plugged in the power cord for the TV. The plan was to connect the HDMI cable from the TV to the AVR unit. For good measure two speaker cables were also dropped down the same hole for the left and right speakers.
CONVERTING THE FIREPLACE INTO A HOME THEATER SHELF:

Talk about Holmes on Homes! But I had no Holmes! This was no fun. The masonry block in the fireplace was not square. I had to build a frame inside, leaving lots of room for wires. Once it was done I was able to hide the RG6 cables coming down the chimney. Most of the speaker wire and the power cords, and the HDMI cable coming in from the TV.
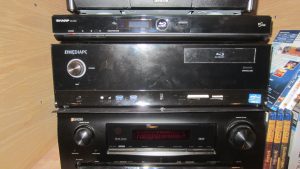
I made a box for the AVR to stand on. This cleared the view of the center channel speaker that you see in the picture. I then stacked my boxes in order of size, my old little Dell PC is at the top.
HANGING THE TV:
I had purchased a wall mount for the TV. On further inspection, I realized that the ledge on the mantle came out from the wall. The Television was too tall to fit between the mantle ledge and the ceiling. I built and anchored a wooden frame I made to the wall and attached the Television to this. It was then possible to connect the HDMI cable, and power cord and the two left and right speakers.
INTERNET:
A D-LINK access point was available in bridge mode, linked to the wireless router. It used a wireless link connection. This allowed for the PC and other equipment to access the internet.
COMPUTER:
Any computer would work but it should have a few specs that will make it run well. It should have an HDMI video card. A Blu-Ray player is nice but not needed. Windows 7 or 8 for changing the screen image. To learn more about what kind of computer to use please read “ Putting the PC in home theater “
 All the devices ( Bell Expressvu, Blu-Ray, PC ) are all plugged into the AVR unit inputs. The HDMI cables that carry the video and sound. The TV is plugged into the AVR’s HDMI output. So when I push a button for Bell Expressvu the AVR puts the video on the TV and sound though the speakers. The two RG6 cables plug into the Bell box allowing us to record two TV channels at the same time. The TV, PC, Blu-Ray are plugged into the D-Link box for internet.
RESULTS:
We use our PC Home Theatre for entertaining all the time. Mainly for iTunes music, YouTube and picture sharing. Now we are watching movies online all the time. It’s easy to turn it on, just one remote turns on the TV and AVR and switches it to input 3 for the PC.
After I wrote this blog about my PC home theatre project I installed a new computer. This one has an awesome case that makes it look like it belongs in a home theatre setup. Inside it a solid state hard drive with Windows 8, and a second 2TB hard drive to hold the movies and music. I am also using a smaller keyboard that has a built in trackball mouse because I find it easier to move around the room.
I also have a separate blog on setting up the Blu-Ray player on a PC. It can be easy but there are quality problems, if you want to learn more about that click on this link here
If you have any questions or would like one setup please speak to the staff at D.C. Computers.


